That was a mainly coniferous wood. Now, that saw is in a deciduous wood, which equally, needs that magical dialogue with us by having its wood cut and infiltrating our lives as made things.
I am finally devising a range of things that people buy, made in a way that suits my hastiness, so am thinking again about the whole process of design.
1.the beginning
I came to woodwork in complete ignorance, having escaped practical skills at school ,and as a left-hander harbouring a feeling of awkwardness. My first approach to timber was from the tree end of things. Having spent years in Forestry plantations picking moss the idea of owning one had greater appeal to me than buying a house ; I wanted to buy a forest and so needed to find a means to make trees pay . The forest was unthinned 30year old softwoods on steep slopes ,so sale of timber to mills was not an option. From somewhere came the idea of cutting logs to hexagons ,and making an outdoor endgrain flooring .Having messed about with various plug-spanner like cutters ,I hit on the idea of offering a clenched log to a saw ,and then rotating it by 60degrees ,etc until a hexagon was cut . A local carpenter reckoned it wouldn’t work[“eh lad ,if you want to cut a hexagon ,you cut it out of a square..”] but Julian Bird ,a local engineer saw no problem with the principle ,and even offered to modify his saw-bench for the project .
That was Hexer Mk. One ,and long ago .For various reasons ,the flooring block as a product came to look difficult .I went down a long cul-de-sac by trying to make an indoor version ,which involved wood stabiliser[PEG] and attempts to make the tiles more accurately .The ultimate weakness of them then ,was that unless I made a range of different diameters ,they required a very specific log size .The lessons in product design were thus :
TOLERANCE. I was trying to make something requiring more accuracy than my technology gave me .Also the nature of the product was essentially unstable[boxed heart] and would tend to split unless it was regarded as a fresh product ,and laid soon after manufacture .
REGIME. I had no profitable use for the logs that were too big or small, or hexagons that came out unclean .
So I had a machine that cut hexagons, and no idea what to make from them. I started ripping the six-sided blanks to boards, and making benches and planters from them but the benches splayed legs tended to trip you up and the tubs just looked wrong .I adapted the saw to cut pentagons which gave a far more appealing taper to both designs.
It is no exaggeration to say that at this stage the design process involved holding two boards together and thinking,” What could I make from these that’s worth £2?” That is a lesson to take to heart, especially when comparing the profitability of two products, though of course plank-value is only one cost in making anything .
After two years of making nothing saleable apart from sawdust and slabwood, the GROTUB was born …a range of planters based on pentagonally cut wood.
I went back to look at hexagons soon after as a customer asked for an interlocking planter and so I designed the TRECASTLE, a tub sourced from hexagons. The TRECASTLE & GROTUB have been the ruling families in my price-list ever since.
The lesson here is to keep in contact with your market and accept some commissions as subsidized research. Probably half my catalogue came about this way.
2.Regimes
You can cut log to any shape you want as long as there is enough wood there to meet the saw. The more facets to the dressed blank, the nearer it is to the original shape of a log. Cutting 4-sided cores from a log generates 35% waste, 5-sided 24%, 6-sided 17%, 8-sided 10%, 10-sided 6%, and 12-sided 4.5% . Of course these calculations are based on perfectly centred loading of perfectly round wood.
I cut 8,10 & 12sided timber as core items, but as an option within simpler regimes of four, five, and six-sided cutting]. A regime is the application of a geometry to a broad range of log diameters. At its simplest it would mean that you cut the cleanest square or pentagon etc out of a log that it will yield. However this is not practical if you seek to produce standard sets of planks and cores, so the compromise is to look for a limited range of sizes, to match a set of increments. As one of the advantages of the HEXER is its ability to accept bent logs, I find in practice that I have some offset cuts as an option to clean up a core.*** The fact that you are addressing each log individually, makes it easy to adjust the cutting choice as you load and cut the first faces.
The smallest core you can produce is just under 2inch. I rip the bulk of my cores to planks [apart from those for corner-pieces etc] and make these about an inch thick, or half the smallest core. A 4inch core cut down to 2inch produces boards of the same thickness. This rotational cutting I call flensing. The more sides a polygon has, the more boards it produces.
The real art is to relate the profiles of your chosen regime to the design of your eventual product, and then to relate back to the saw regime to generate an optimum and proportionate yield.
I run four basic regimes that use all the logs that come to the saw. In practice, the Square and Hexagon regimes I work to are quite limited in the profiles I look for, and the Pentagon and Bentwood regimes have evolved to absorb the rest.
If your present timber-use is square, a way to diversify would be to introduce 8-sided cuts. You could do this both before planking down to your usual square [eg. 6inch 8sided>4inch 4sided] or to dress dirty squares [eg. 4inch square with corners dressed to 5inch or 4inch etc]. Its also worth bearing in mind there is a design and function choice between cutting a sharp angled board, and the option to produce a board with a dressed corner.
Although a significant proportion of the flense boards and all the core boards are readily absorbed into products, there are always extremes, and boards that are dirty on one corner. These I “redefine” to standard boards. I have never owned a saw with a tilting blade, so needs-must made me put together a tilted bed with a clamp for the board that fits on the sliding table. I suspect that if you are working a few geometries this might be quicker and safer than setting a saw angle; I have a hex & pent re-definers, to serve my main regimes.
Another consideration is the relative stability of boards, in terms of their application. Core-boards are more stable and durable than flense-boards, so should be favoured in products that use longer planks. Again this comes to how you address the nature of a regime of yield to the eventual product range.
PARTICULAR REGIMES
Trecastle/sixsided planter
Start with a simple one. The hex. I have one main planter range based on hexagons. This relies on 3 main profiles that are the face-boards, the corner-pieces, and the base material.
The boards are cut from 4inch to zero hexagons, producing 4 x3.25inch planks; 2 by flensing & 2 by ripping the core. The next cut up is 6.25>4etc that generates 4 boards plus a narrower & wider one. The narrow board produced every time you cut 4 trecastle boards has been a bane on my life, and having designed and tried a trellis system, window-box bracket, and triangular planter based on it, I have found that it good as base material, and so longer accumulates. The wider***board is redefined to make a trecastle board, or if too dirty, goes into base material. The next cut up is 8.5>6.25>4>zero, and puts all but the last board into redefiner stock. The occasional mega-log gives you 10.75>8.5 etc. This I put in redefiner rack.
The corner-pieces are 3inch cores, cut to 2.5inch on 2 opposite sides. These we cut in half. [The ideal is to match the abutment of the corner-piece to the thickness of the adjoining board, so the internal face of the planter is regular]
Base material is the rest, in the sense that it can be dirtier and thinner, and the combinations of width, with the option to flip boards so they interlock and lose half an inch, mean that all is valuable. This will be clearer when we get to kitting.*** I used to cut base boards from 1.5inch hex material, but since using the narrow board a lot more for bases, have thickened them by .25inch. So a desperate-for-base material regime would be >8.5>5.75>4.00 and then cut face-boards from the core. Mostly they occur without seeking, as reject face boards.
This would not be a satisfactory product to run on its own, as there are great gaps in the log-use regime. We had a great run of this, when we had a string of bulk batches of trecastles to make for a mail-order company, when we were in the middle of a very thin thinning.*** One solution is to run another product to use the boards from the rest of the regime. Another is to have alternative regimes.
Trecastles require a good lump of timber, and a lot of hexing, but the pay-off is a very simple kitting and fabrication stage, and an eventual product that looks like it took hours to make[high perceived value] and looks good.
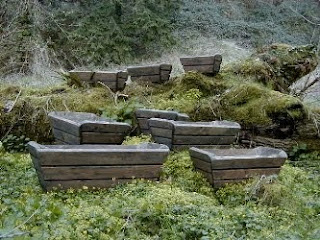
Grotubs/fivesided cut Planters.
Pentagonal wood-cutting is the deep-end. If the hexagon is male & roman, the pentagon is female & grecian. The angles of a pentagon are restful and subtle. The hexagon is formal[military] and structural. Hexagons are simple. Pentagons look complicated. In fact their yield is very simple.
I presumed from the start that the board-yield from cutting pentagons was wild, so set the regime in small increments of half an inch. So: zero/2inch/2.5/3/3.5/4>z/4.75>2.5/5.25>3/5.75>3.5/6.25>4>z etc. These are pure pentagons. The useful thing is the simple range of boards they yield: the core pentagons make six different boards, and the first flenses for the main part, duplicate these. For instance the 1st board from a 3.5pent is the same the 2nd board from a 2.5pent is the same as the main board from a 5.25>3 flense. I will represent these in a chart***
The components of grotubs are face-boards, bases, corner-pieces, and feet.
The corner-pieces are pentagonal triangles that are the last cut from 2.5 + 3.5 cores. They are not geometrically correct, but fit snugly enough. They also help hide stray nailing.
The face-boards are the main five pent-boards[2.5,2.75,3.25,3.5,3.75] .I kit these in descending width on the front face of a planter, and ascending width on the side face. This gives more nail room, which helps as the tubs are built up from the base like a basket. Useage has come up with three main board sets. The wide boards are stacked 3.75/3.5/3.25. The narrow boards set up as 3.25/2.75/2.5. The windowbox set is a great absorber of the rest, as it stacks 3.75 with 2.75, and 3.5 with 3.25.
Feet, I cut from 2inch boards.
Base material fits main board profiles, but allows use of inferior boards. Windowbox bases are narrow and square-cut on one face, so absorb a lot of narrow planks & off-cuts from redefining.
The gist of this is that a family of planters has come about that uses the yield of pentagons. The uncontrollable element in the end is customer demand. The grotub range seems well balanced in this sense, but wouldn’t stand the test of a big order for one type of planter unless there was a reciprocal order for another that used the wider or narrower planks. There is leeway during the hexing & redefining , but there is a basic distinction between the wide & narrow boards stacks, which relate back to the range’s function, that is using timber that is the dross from poor forest thinnings and more demanding saw regimes.
The exception is the windowbox, that absorbs planks from across the range in its faces, thin boards in its base, and offcuts in its short-faces.
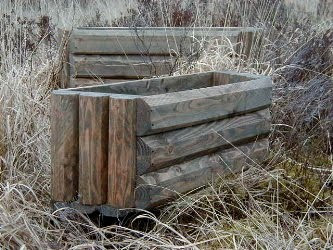
Mezas
These were the second generation. Their purpose was to absorb unused boards from the grotub regime, being the first board from a 2inch pent & the third board from a 3.5pent. The customer remit was for a planter to go against a wall. The ends have a novelty , as they are made from 2.5inch pent generated trapeziums, with the corners rounded. They are clinched with internal nails. Their success led me to develop a smaller one as well, though not a shorter one, as a significant part of the effort in making them is sourcing & sawing the end profiles.
I have also come to source face and base boards from elsewhere in the pentagon regime. The decorative feature of the face-boards is a blunted, sloped edge. Their 3.5inch width is cut by simple ripping. Thus I can blunt a bigger pentagon before taking off flense-boards, for example by cutting a slightly dirty corner off a 4.75inch pent, at 5.25inch setting. Base boards were originally the second ripped board from a 2inch pentagon, but I also blunt the edges of a dirty 2.5inch pent before ripping to get an equivalent looking plank. Thus the Meza has offered an opportunity to make clean & useful boards from dirty boards, by taking off the edge. Bear in mind that if you want to blunt a board, rather than cut a sharp 10side angle, you need to tweak up more for the blunting cut the bigger the pentagon is.
Petalpot
The 3rd board from a 3inch pent rip sometimes has enough bluntness to make an attractive front-board on the meza. I used to cut these in pairs to 6inch pieces, and nail them to make a 10sided pot, but fiddliness and variability has put me off these as a product. A slight variation in width is magnified ten-fold in the eventual pot, and the ten-sided angle is not an easy one to redefine[although I have made a jig for this purpose]. Bases were slices of large [8-9inch] decagons; not easy things to cut on a standard saw-bench!
Beaumaris, Tallboys
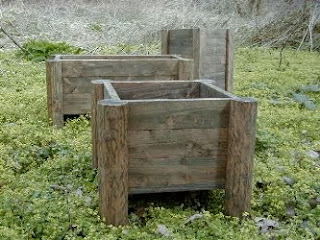
These planters are a study in “L” shape work. The tallboy is bog-standard square design, but encompasses some of the log-to-product efficiency of polygon cutting. The beaumaris uses a 12sided corner-piece to add value to what would otherwise be a box. They are both third generation, in the sense that their designs refer back to the hexer, rather than stemming from trying to make use of its eccentric profiles.
The tallboy is based on 2.5inch boards[sbw] with 2.5inch square corner-pieces. I cut a 1.5inch square out of these, to make a chunky “L” shape. This square I rip to sbw to make strips to hold the base-boards. These strips & the face-boards I cut to 45degrees to make a mitred internal box. The timber efficiency comes from cutting them principally from 5.25inch squared. Not only does this mean that the planks & corner-pieces are effectively quarter-sawn, but corner dirt can be taken off on the 1.5inch square. This would be a useful design to work with if you do other square-cut products, as its narrow planking helps absorb waste.
The planks of beaumaris are 3.5x1inch. This amounts to ripping a 3.5 square into three planks. The corners are 3inch duo-decagons[12sided] but with one square corner left on. Again, this is cut off to 1.5inch, so needn’t be clean, or only clean enough to make a clean sbw base-strip.
Both these designs require a good ripping facilities.
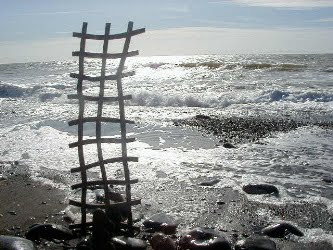
Cottager
Often it is the more outrageous or cheeky products that have most appeal. The “rustic” look is not a thing best suited to mass-produced, straight-edge sawing, so working bentwood gives you a distinctiveness. However neither you, your outlets, or even the end customer necessarily want “one-off” products; so the intention should be to achieve this look, but by simple batch techniques.
Palings. Smaller logs I cut to accentuate the bend on one face and then rip to planks. Back rails I cut from 48inch long ,cleaned on one face and ripped to sbw.
Trellis. Thicker bent logs I cut on two opposite faces, again looking for the curve. I don’t tend to make them any thicker that 3.5inch, for the sake of the bandsaw. The next bit is to take off one cleanish face on the bandsaw, and then plank the curves. A long fence is useless for this. What I set up is a jutting roller as a guide. As long as the blade is not on its last bit of life, this works well. These bent planks I then rip[in twos or threes] to make curved strips, which are the material for the trellis. The patterns of trellis made from this are significant, as the fan pattern can absorb a lot of partially clean pieces, and the ladder some. Luckily, the fan is the most popular pattern.
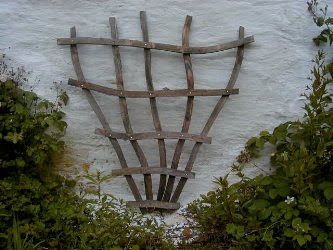
There is a lot more potential in this method of working bentwood than is realised in these 2 products. I have applied it to a threshold mat, and as backing in some furniture to great effect, so recommend you explore bentwood use.
Birdhouses etc
Planters have always been my main thing, so Birdhouse design has tended to ride on routine regimes. I use 5,6,10,12, and now 8sided timber in various products. This is useful, as it means I can seek & maximise birdhouse material while still working planter profiles, or hoard the odd board for later birdhouse use off-season, should they occur.
Birdcare is relevant to a tub-maker, as it provides a perfect Shadow Season. Also, birdboxes use less timber than planters, which suit the winter, when it is better inside a workshop than out in the forest, felling.
I have seen the niche the hexer’s cleverness at unwrapping a log opens as being a means to make functional but attractive bird boxes etc. The other available marketed extremes are plywood barracks, made to perfect technical specifications, but UGLY; or things with thatch+chimneys and the wrong sized holes. Birds don’t buy birdboxes. People do. However, the eventual purpose of a birdbox is to raise a successful clutch, not feed predators.
Birdhouse/openhouse/batroost These are all based on an offset 10sided profile; 5.25 apart from 4 corners at 5.75. This gives a back. The core is to cut to 3inch trapezium. 80% of these can be absorbed back into other grotub products, as basic pent boards, or meza minor ends. Again, the art is to source these profiles elsewhere. Sides are easy; you can select out stuff from the meza[3.5 3rd board] to redefine for a start, or blunt a 5.25 pent to 5.75 before flense & redefine. Fronts are easily sourced, from 10 siding a log, & then trapeziuming it, to get three. Backs can be added to by cutting a 5.75 pent, blunting 4 edges and taking 2 wide boards[to 3.5 =sbw]. [The other boards, being a 3.5 + 2 x 2.5inch planks go to grotub stock]. Side birdhouse boards are redefined, as are cores, but backs & fronts are not, so there is a certain amount of selection when you get to making boxes. I cut the top & bottom stubs from the trapeziums into definite piles[14@18degrees, 14@90] to be able to identify sets that take wider or narrower fronts or backs. When you work with variables, there are always unusable extremes of front & back, so be prepared to burn some. The easy side of the birdbox kitting is that everything gets cut to an initial 10inches. The backs stay cut so, but the sides are cut @18degrees to
fit
Like a fragment from some lost cave of excitement, this writing up of hexing ends....
I still work with the same, unique saw.
It still feeds me new ideas.
I now work with Ash, so am versed in bentwood.